
OneDrive is a powerful online solution for storing and sharing pictures, Office documents and other files. I’ll explain how to use OneDrive, how to disable it, as well as describe some of its limitations and how you can manage key features using the sync app.
What is OneDrive and how is it used?
OneDrive is Microsoft’s cloud storage solution for personal and work files online. It allows you to store and protect files, share files with others, and access files from anywhere on all of your devices. By default, the folders and files in OneDrive remain private until a user shares them with others. You can sync the files and folders stored in Windows and Mac OS X with OneDrive, as well as collaborate on SharePoint Team sites and Microsoft Teams. Files can be added to the default Documents location or in new document libraries in the SharePoint Team site.
Additionally, you can restore OneDrive files from the Recycle Bin if they are overwritten, corrupted, or infected by malware. However, deleted files cannot be restored after they’ve been removed from the site collection recycle bin—either by manual delete or by emptying the recycle bin.
You can also restore from a previous version of a file. However, when version history is turned off, Files Restore won’t be able to restore files to a previous version.
Does OneDrive have limits?
OneDrive has limits to ensure that users can adequately use OneDrive at an acceptable performance level for everyone. Here are some examples of these limitations.
- Users can store up to 50,000 major versions and 511 minor versions of a document.
- The maximum stored file size of a single file is 100GB.
- 99 users can have a document open for editing at the same time. If more than 10 users edit a document simultaneously, their edits are more likely to conflict with each other and the user experience will gradually degrade.
- The available storage space per user is determined by the plan that the user/organization has in place.
- If some files or folders cannot be restored, a log file will be generated at the root folder of your OneDrive to capture the errors.
More information about limitations in OneDrive can be found here.
You can learn more about the different OneDrive business plans here.
How to use OneDrive and manage key features
OneDrive Online has several management features available. Below, we will cover how to use OneDrive’s key features.
1. Files on-demand
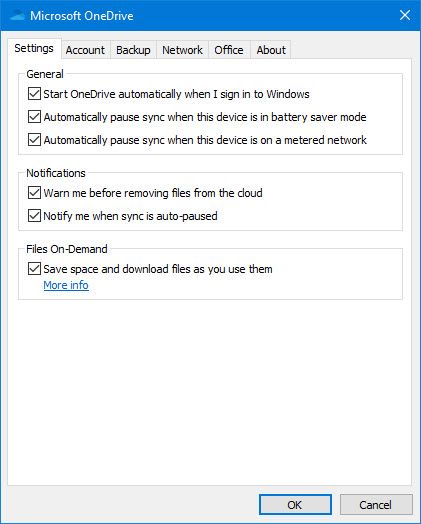
You can turn on Files On-Demand by opening the OneDrive Sync app on your PC and clicking on Help & Settings, and then clicking the Settings tab and checking the Files On-Demand checkbox. Here, you can right-click on a file or folder and select Always keep on this device or Free up space. Selecting Free up space will keep the file or folder in OneDrive Online; but only display a stub in your PC’s File Explorer. The file or folder is downloaded when you open it; but not before. Thus, you can free up space on your PC.
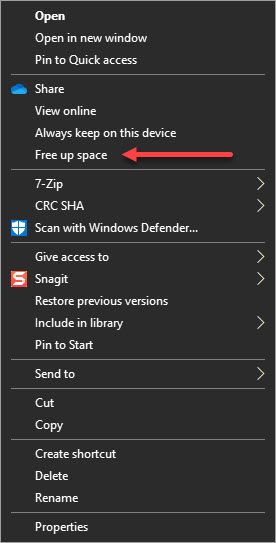
You can learn more about Files On-Demand here.
Learn more about OneDrive file sharing in this post: The ins and outs of sharing files in OneDrive Online.
2. Adding more PC folders to OneDrive
A common practice is to synchronize your Documents folder on your PC with OneDrive. You can also add folders in other locations on your PC and move any folders and files in File Explorer to the OneDrive folder. For example, if you use a folder called “Data Documents”, you can move that entire folder into OneDrive in File Explorer. (The new folder path would be C:\Users\[username]\OneDrive\Data Documents).
3. Backing up important PC folders
You can backup important PC folders such as Desktop, Documents and Pictures files to OneDrive. To do this, open the OneDrive Sync app on your PC, click on Help & Settings, then click the Backup tab, and then click Manage backup. Here, you will follow the instructions to configure the folder backup.
Note that you may receive a warning that some files cannot be backed up. For example, you may have created an archive PST file for your Outlook mail and stored it in OneDrive. However, Outlook database files (.PST) cannot be protected by PC folder backups.
You can learn more about backing up important PC folders here.
4. Configuring sync conflicts
OneDrive offers the ability to configure file collaboration and sync conflicts. To do this, open the OneDrive Sync app on your PC, click on Help & Settings, and then click the Office tab.
For file collaboration, you can check the Use Office applications to sync Office files that I open checkbox. By doing this, the applicable Office application will automatically merge changes from different versions of documents.
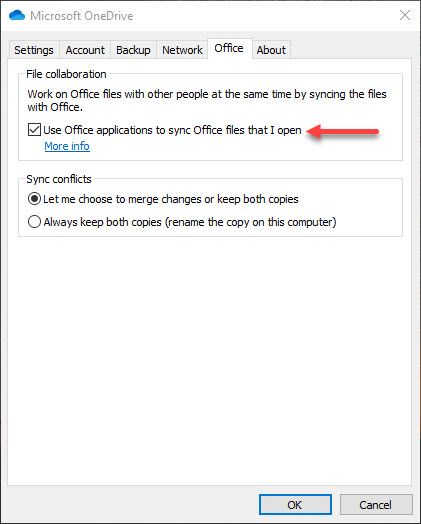
With the file collaboration option checked, the Sync conflicts setting is displayed. You can choose from one of two options. If you choose the Let me choose to merge changes or keep both copies option, OneDrive will ask you if you want to open the file in Office to merge the changes or keep both copies. If you choose the Always keep both copies (rename the copy on this computer) option, OneDrive keeps both copies of the file and renames the copy on your computer to add the computer name to the file name.
You can learn more about configuring sync conflict settings here.
Disabling OneDrive
There may be some circumstances where you want to permanently disable OneDrive on your PC. Perhaps you do not want to store your PC files in the cloud for personal or business reasons. If you uninstall OneDrive on your Windows 10 computer, your OneDrive folder will stop syncing; but any files or data you have in OneDrive Online are still available when you sign into OneDrive Online.
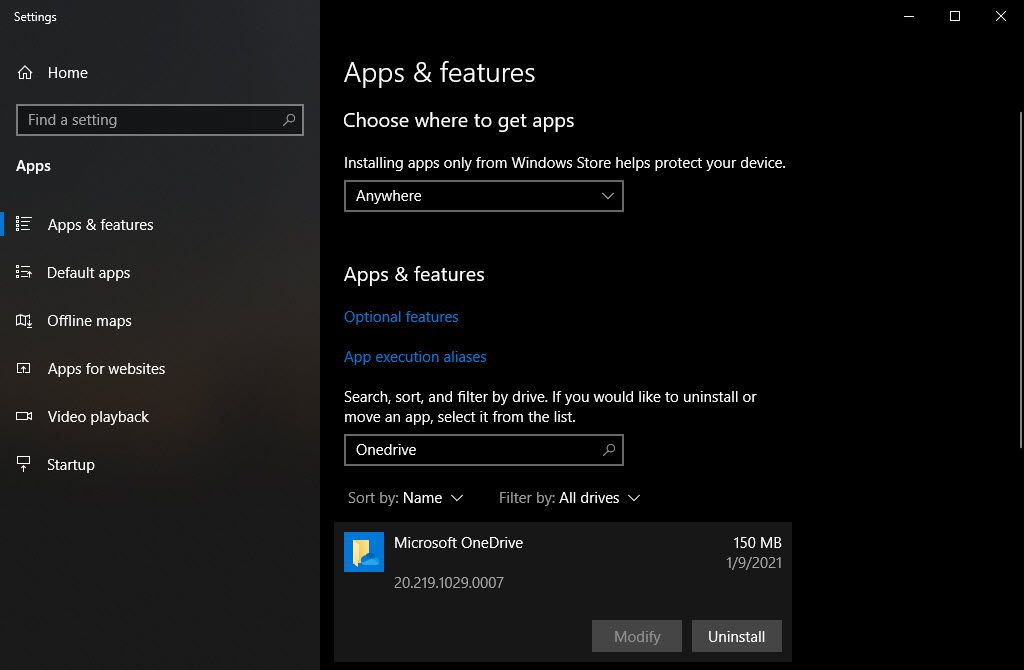
To uninstall OneDrive, click the Start button, then in the search box, type Add Programs, and then in the list of results, click Programs and Features. Here, you want to click Microsoft OneDrive, and then click Uninstall. If you’re prompted for an administrator password or confirmation, type the password or provide confirmation. Your files will remain on your PC and in OneDrive; but the sync app is removed.
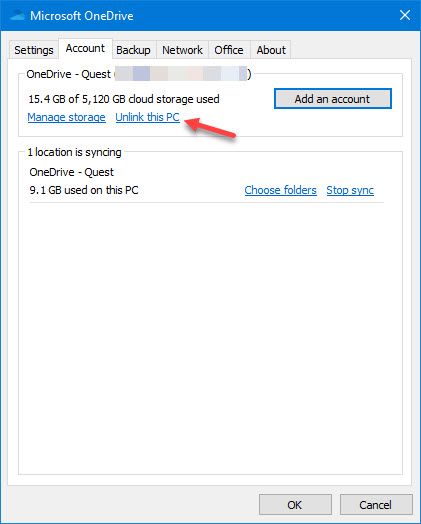
Alternatively, you can unlink your computer from OneDrive. Just like uninstalling, you won’t lose files or data by unlinking OneDrive from your computer. You can always access your files by signing in to OneDrive.com; but it will no longer sync folders and files. To do this, select the white or blue OneDrive cloud icon in the taskbar or menu bar. Then select the OneDrive Help and Settings icon. On the Account tab, you will click Unlink this PC and then Unlink account.
Disabling your OneDrive after it is provisioned is a more difficult task. Your organization’s administrator can use the Set-SPOSite cmdlet to set the LockState of your OneDrive site to NoAccess. In this case, your OneDrive site becomes inaccessible and will display 403 errors when attempts to open your OneDrive URL are made. Your files and folders are still in OneDrive; but are inaccessible to everyone. Syncing will not work since your OneDrive is inaccessible.
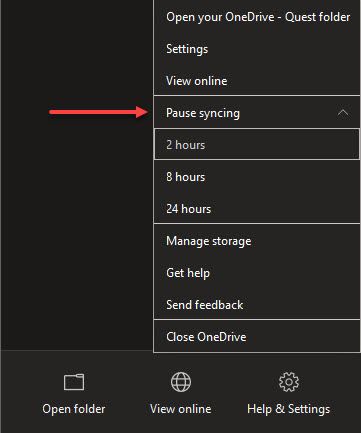
Perhaps you only want to temporarily stop syncing your files to OneDrive. This may happen when you are experiencing a very slow internet connection, you need to reboot your PC, or some other technical issue. To do this, click on the OneDrive cloud icon on the task bar, click on Pause syncing, and select a time period. The syncing process will pause for the selected time period.
Conclusion
By using OneDrive, sharing folders and files with internal and external users is much easier. As we touched on, there are some limitations on how to use OneDrive, but these are in place to ensure that the OneDrive workload performs as it should for its users. Using OneDrive’s sync app offers the ability to manage key features including backing up folders and file conflict resolution. Uninstalling or unlinking OneDrive is pretty straightforward—while disabling OneDrive completely is a bit more challenging. Hopefully, disabling is not something that you need to do, and you can simply pause syncing to fix any issues.
For more insight on how to use OneDrive and the benefits of using it, check out this post: The top 5 benefits of using OneDrive.


