

In relational databases, we create tables to store data in various formats. SQL Server stores data in a row and column format which holds a value associated with each data type. When we design SQL tables, we define data types such as integer, float, decimal, varchar and bit. For example, a table that stores customer data might have fields such as customer name, email, address, state, country and so on. Various SQL commands are performed on a SQL table and can be divided into the following categories:
- Data Definition Language (DDL): These commands are used to create and modify the database objects in a database.
- Create: Creates objects
- Alter: Modifies objects
- Drop: Deletes objects
- Truncate: Deletes all data from a table
- Data Manipulation Language (DML): These commands insert, retrieve, modify, delete and update data in the database.
- Select: Retrieves data from a single or multiple table
- Insert: Adds new data in a table
- Update: Modifies existing data
- Delete: Deletes existing records in a table
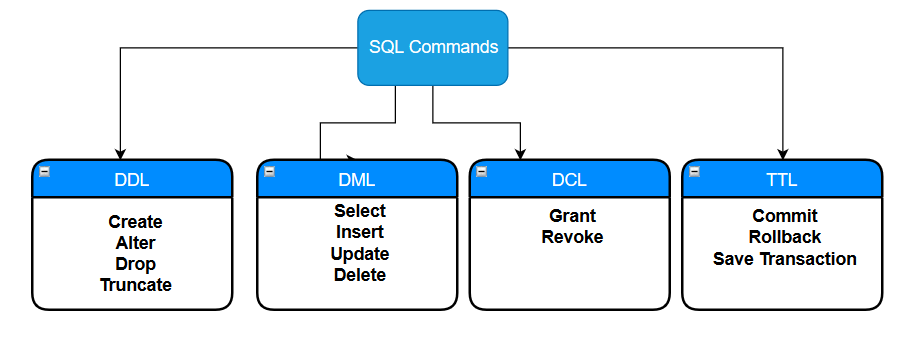
- Data Control Language (DCL): These commands are associated with rights or permission controls in a database.
- Grant: Assigns permissions to a user
- Revoke: Revokes permissions from a user
- Transaction Control Language (TCL): These commands control transactions in a database.
- Commit: Saves the changes made by the query
- Rollback: Rolls back an explicit or implicit transaction to the beginning of the transaction, or to a savepoint inside the transaction
- Save transactions: Sets a savepoint or marker within a transaction
Suppose you have customer order data stored in a SQL table. If you kept inserting data in this table continuously, the table could contain millions of records, which would cause performance issues within your applications. Your index maintenance might also become extremely time consuming. Often, you do not need to retain orders that are older than three years. In these instances, you could delete those records from the table. This would save storage space, as well as reduce your maintenance efforts.
You can remove data from a SQL table in two ways:
- Using a SQL delete statement
- Using a truncate
We will look at the difference between these SQL commands later. Let’s first explore the SQL delete statement.
A SQL delete statement without any conditions
In data manipulation language (DML) statements, a SQL delete statement removes the rows from a table. You can delete a specific row or all rows. A basic delete statement does not require any arguments.
Let’s create an Orders SQL table using the below script. This table has three columns [OrderID], [ProductName] and [ProductQuantity].
Create Table Orders( OrderID int,ProductName varchar(50),ProductQuantity int)
Insert a few records in this table.
Insert into Orders values (1,'ABC books',10),(2,'XYZ',100),(3,'SQL book',50)
Now, suppose we want to delete the table data. You can specify the table name to remove data using the delete statement. Both the SQL statements are the same. We can specify the table name from the (optional) keyword or specify the table name directly after the delete.
Delete OrdersGoDelete from OrdersGO
A SQL delete statement with filtered data
These SQL delete statements delete all the table’s data. Usually, we do not remove all the rows from a SQL table. To remove a specific row, we can add a where clause with the delete statement. The where clause contains the filter criteria and eventually determines which row(s) to remove.
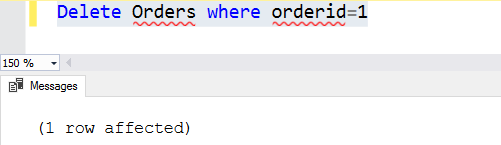
For example, suppose we want to remove order id 1. Once we add a where clause, SQL Server first checks the corresponding rows and removes those specific rows.
Delete Orders where orderid=1
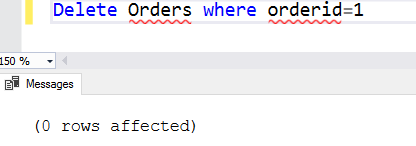
If the where clause condition is false, it does not remove any rows. For example, we removed the ordered 1 from the orders table. If we execute the statement again, it does not find any rows to satisfy the where clause condition. In this case, it returns 0 rows affected.
SQL delete statement and TOP clause
You can use the TOP statement to delete the rows as well. For example, the below query deletes the top 100 rows from the Orders table.
Delete top (100) [OrderID]from Orders
Since we have not specified any ‘ORDER BY’, it picks random rows and deletes them. We can utilize the Order by clause to sort the data and delete the top rows. In the below query, it sorts the [OrderID] in descending order, and then deletes it from the [Orders] table.
Delete from Orders where [OrderID] In(Select top 100 [OrderID] FROM Ordersorder by [OrderID] Desc)
Deleting rows based on another table
Sometimes we need to delete rows based on another table. This table might exist in the same database or not.
- Table lookup
We can use the table lookup method or SQL join to delete these rows. For example, we want to delete rows from the [Orders] table that satisfy the following condition:
It should have corresponding rows in the [dbo].[Customer] table.
Look at the below query, here we have a select statement in the where clause of the delete statement. SQL Server first gets the rows that satisfy the select statement and then removes those rows from the [Orders] table using the SQL delete statement.
Delete Orders where orderid in(Select orderidfrom Customer)
- SQL Join
Alternatively, we can use SQL joins between these tables and remove the rows. In the below query, we join the tables [Orders]] with the [Customer] table. A SQL join always works on a common column between the tables. We have a column [OrderID] that join both tables together.
DELETE OrdersFROM Orders oINNER JOIN Customer c ON o.orderid=c.orderid
To understand the above delete statement, let’s view the actual execution plan.
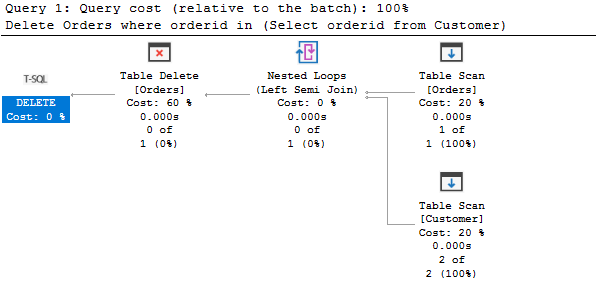
As per the execution plan, it performs a table scan on both tables, gets the matching data and deletes them from the Orders table.
- Common table expression (CTE)
We can use a common table expression (CTE) to delete the rows from a SQL table as well. First, we define a CTE to find the row that we want to remove.
Then, we join the CTE with the SQL table Orders and delete the rows.
WITH cteOrders AS(SELECT OrderIDFROM CustomerWHERE CustomerID = 1 )DELETE OrdersFROM cteOrders spINNER JOIN dbo.Orders o ON o.orderid = sp.orderid;
Impacts on the identity range
Identity columns in SQL Server generate unique, sequential values for your column. They are used primarily to uniquely identify a row in the SQL table. A primary key column is also a good choice for a clustered index in SQL Server.
In the below script, we have an [Employee] table. This table has an identity column id.
Create Table Employee(id int identity(1,1),[Name] varchar(50))
We inserted 50 records in this table which generated the identity values for the id column.
Declare @id int=1While(@id<=50)BEGINInsert into Employee([Name]) values('Test'+CONVERT(VARCHAR,@ID))Set @id=@id+1END
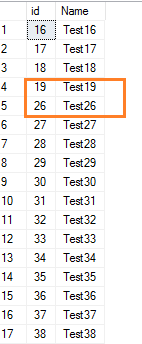
If we delete a few rows from the SQL table, it does not reset the identity values for the subsequent values. For example, let’s delete a few rows that have identity values 20 to 25.
Delete from employeewhere id between 20 and 25
Now, view the table records.
Select * from employee where id>15It shows the gap in the identity value range.
SQL delete statement and the transaction log
SQL delete logs each row deletion in the transaction log. Suppose you need to delete millions of records from a SQL table. You do not want to delete a large number of records in a single transaction because it might cause your log file to grow exponentially and your database might be unavailable as well. If you cancel a transaction in the middle, it could take hours to rollback a delete statement.
In this case, you should always delete rows in small chunks and commit those chunks regularly. For example, you can delete a batch of 10,000 rows at a time, commit it and move to the next batch. When SQL Server commits the chunk, the transaction log growth can be controlled.
Best practices
- You should always perform a backup before deleting data.
- By default, SQL Server uses implicit transactions and commits the records without asking the user. As a best practice, you should start an explicit transaction using Begin Transaction. It gives you the control to commit or rollback the transaction. You should also run frequent transaction log backups if your database is in full recovery mode.
- You want to delete data in small chunks to avoid excessive transaction log usage. It also avoids blockings for other SQL transactions as well.
- You should restrict permissions so users cannot delete data. Only the authorized users should have access to remove data from a SQL table.
- You want to run the delete statement with a where clause. It removes filtered data from a SQL table. If your application requires frequent data deletion, it’s a good idea to reset the identity values periodically. Otherwise, you might face identity value exhaustion issues.
- In case you want to empty the table, it is advisable to use the truncate statement. The truncate statement removes all of the data from a table, uses minimal transaction logging, resets the identity value range, and is faster than the SQL delete statement because it deallocates all the pages for the table immediately.
- In case you use foreign key constraints (parent-child relationship) for your tables, you should delete the row from a child row and then from the parent table. If you delete the row from the parent row, you can also use the cascade on delete option to automatically delete the row from a child table. You can refer to the article: Delete cascade and update cascade in SQL Server foreign key for further insights.
- If you use the top statement to delete the rows, SQL Server deletes the rows randomly. You should always use the top clause with the corresponding Order by and Group by clause.
- A delete statement acquires an exclusive intent lock on the reference table; therefore, during that time, no other transactions can modify the data. You can use NOLOCK hint to read the data.
- You should avoid using the table hint to override the default locking behavior of the SQL delete statement; it should only be used by experienced DBAs and developers.
Important considerations
There are many benefits of using SQL delete statements to remove data from a SQL table, but as you can see, it requires a methodical approach. It’s important to always delete data in small batches and to proceed with caution when deleting data from a production instance. Having a backup strategy to recover data in the minimum amount of time is a must to avoid downtime or future performance impacts.