
A Power BI migration is a complex task, and there are no native or third-party tools to facilitate the process. To help, I posted an article on Practical 365 that offers a framework for migrating Power BI from one tenant to another. It involves a 10-step workflow grouped into four phases: analysis, planning, migration and remediation. Today, I’m going to flesh out the planning phase.
Planning a successful Power BI migration involves the following steps:
- Scope the Power BI migration.
- Determine the migration paths.
- Batch the workspaces for migration.
- Schedule the Power BI migration jobs.
Let’s dive in!
Step 1: Scope the Power BI migration.
It’s important to flesh out the scope of your Power BI migration by digging deeper into the components flagged for migration in the analysis phase. For example, you need to understand which reports rely on the same dataset, since it is usually best to migrate them together.
Be sure to review all of the following components:
- Source data location — Power BI reports are based on data from various systems in either the tenant or the on-premises environment. It’s vital to determine which systems each report relies on so you can ensure the report continues to work after migration.
- Gateways — For the Power BI Service to access an on-premises data source, you need to configure a gateway in the tenant. Accordingly, when you migrate a report that relies on a gateway in the source tenant, you will need to configure a new gateway in the target tenant to enable continued access to the on-premises system after the Power BI migration. There are two types of gateways:
- Shared gateways are created at the system level and typically have dedicated servers on premises. Shared gateways can be recreated by administrators.
- User gateways are created by end users. You need to inventory them and then make sure users understand when and how to reconfigure them in the new tenant.
- Source data connections — Access to source data is controlled by authentication permissions stored in the data sources. Be sure to review them to prepare for phase 4 of the migration workflow (remediation), which includes updating the source data connections and educating users about the need to re-authenticate.
- Dataflows — The retrieval of source data can be automated using dataflows. These dataflows need to be recreated in the target tenant to enable the same data access after reports are migrated.
- Shared datasets — Multiple reports can rely on the same dataset. It’s important to understand these situations so you can plan to migrate the reports together and also ensure that the sharing permissions are re-applied in the target tenant.
- Workbooks — Excel files can be imported into Power BI to create a workbook, which functions similarly to a dataset but is a static data source that can be directly edited by an end user. In these cases, it can be easier to have the end user move the file into the new tenant; migrating the file would require a Premium capacity for API-level access.
- Files imported using standard capacity — The Power BI Service stores backend data for datasets and imported files differently for standard workspaces and those created with Premium capacity. Since the service does not provide direct access to files imported using Standard capacity, those files need to be identified and possibly re-imported post-migration.
- Workspace type — There are two types of Power BI workspaces:
- A shared workspace is available to all tenant users; access is controlled by the sharing permissions applied to the workspace by roles such as Administrator, Creator and Reviewer.
- A personal workspace is created by default for each account that has a Power BI license, and the user is the workspace owner. Personal workspaces can be shared with other tenant users.
- Workspace sharing — Typically, end users create reports that are then read by many other users in the organization. Accordingly, the scoping exercise should not be limited to the accounts that create content; it’s equally important to identify all the consumers of the content so you can ensure uninterrupted access.
Step 2: Determine the migration paths.
When migrating traditional Microsoft workloads, you have three options for each item in the source tenant: migrate, do not migrate and archive. But those options aren’t sufficient for the various components of a Power BI migration. Accordingly, we developed the “6 R” classification shown in Figure 1. It includes the following pathways:
- Remove — The item is obsolete and needs to be decommissioned or deleted from the source.
- Retire — The item is obsolete but should be left in the source.
- Remain — The item is not obsolete but should be kept in its current environment or saved locally by its owner.
- Rebuild — The item is to be rebuilt from scratch.
- Replace — The item is to be replaced by an alternate solution.
- Rehost — The item will be moved to the target environment in a “lift and shift” operation.
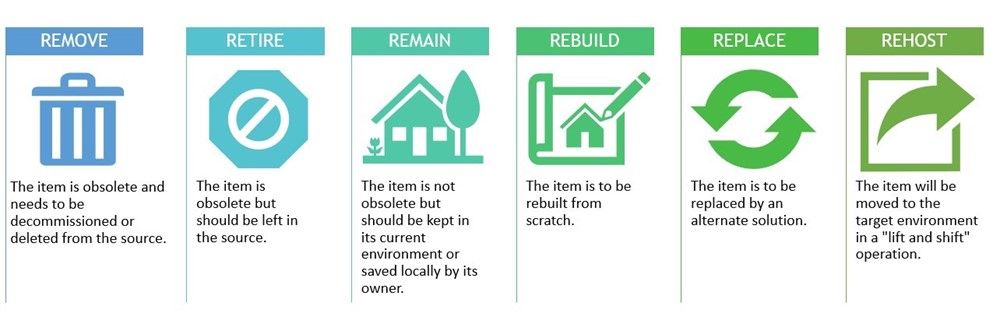
Figure 1: The six Power BI migration pathways
Step 3: Batch the workspaces for migration.
To ensure business continuity, it’s important to time the migration of content carefully. Be sure not to move Power BI content until the accounts that manage and use the content are licensed to access the new tenant.
For a successful Power BI migration, you also need to ensure that the source data will be accessible. While Power BI supports many data sources, they typically fall into one of the following five categories:
- User data in the tenant — Some source data is specific to an account in the source tenant, such as the user’s OneDrive. These data sources should be migrated before the associated reports.
- Shared data in the tenant — Other source data is not specific to a user, such as an Azure SQL instance. If the source data is to be migrated, that migration must be completed before processing the report move. If the source data is to remain in the source tenant, then the report needs to be migrated and re-link to the data source.
- On-premises data — On-prem data sources, such as SQL instances or Excel files on a workstation, require a gateway, which must be recreated in the target tenant before migrating the report. As explained above, shared gateways can be recreated by tenant administrators while user gateways need to be recreated by the user.
- Data hosted online — Data from online sources like Salesforce and NetSuite can be accessed through third-party APIs. Since the source data will remain in the same location, all you need to do is educate users about the need to re-authenticate after the report is migrated.
- Imported data — Reports can be based on imported Excel files. In these cases, you can move the report template, but unless the workspace was created using Premium capacity, the end user will need to copy the source Excel file into the new tenant.
Also pay attention to workspace type, as defined earlier. Shared workspaces can be batched together based on the accounts that access them, while personal workspaces are typically migrated with the user account that owns them.
Step 4: Schedule the migration jobs.
Once you’ve grouped the workspaces into appropriate batches based on the users that are tied to them and the data sources, you can schedule the Power BI migration jobs.
When creating your Power BI migration schedule, be sure to consider the following:
- Account move status — Personal workspaces can be moved only after the accounts are licensed for Power BI in the new tenant. Shared workspaces can be moved before all associated accounts are migrated, but it is best to ensure that the administrators are active in the new tenant.
- Source data status — Have all required updates to data source locations prepared so you can make them promptly after processing the related batch of workspaces. For example, if a report uses a dataset that is connected to Excel in a user’s OneDrive, then the connection details for the user’s OneDrive in the new tenant need to be available after the report is moved.
- Gateways — For reports that rely on on-premises data, a new gateway must be created in the new tenant. You can schedule their creation before the migration of the related batch of reports.
- Volume — The Power BI Service employs throttling on API use. This can cause delays in batch moves, so take it into account during the scheduling process.
Final thoughts
Careful and thorough planning is critical to the success of your Power BI migration. Invest the time required to accurately scope the project, work with your business counterparts to determine the best migration path for each component, batch the workspaces appropriately, and schedule the migration jobs thoughtfully. It will pay off handsomely in a smoother migration that minimizes stress on the IT team and disruption to business processes.